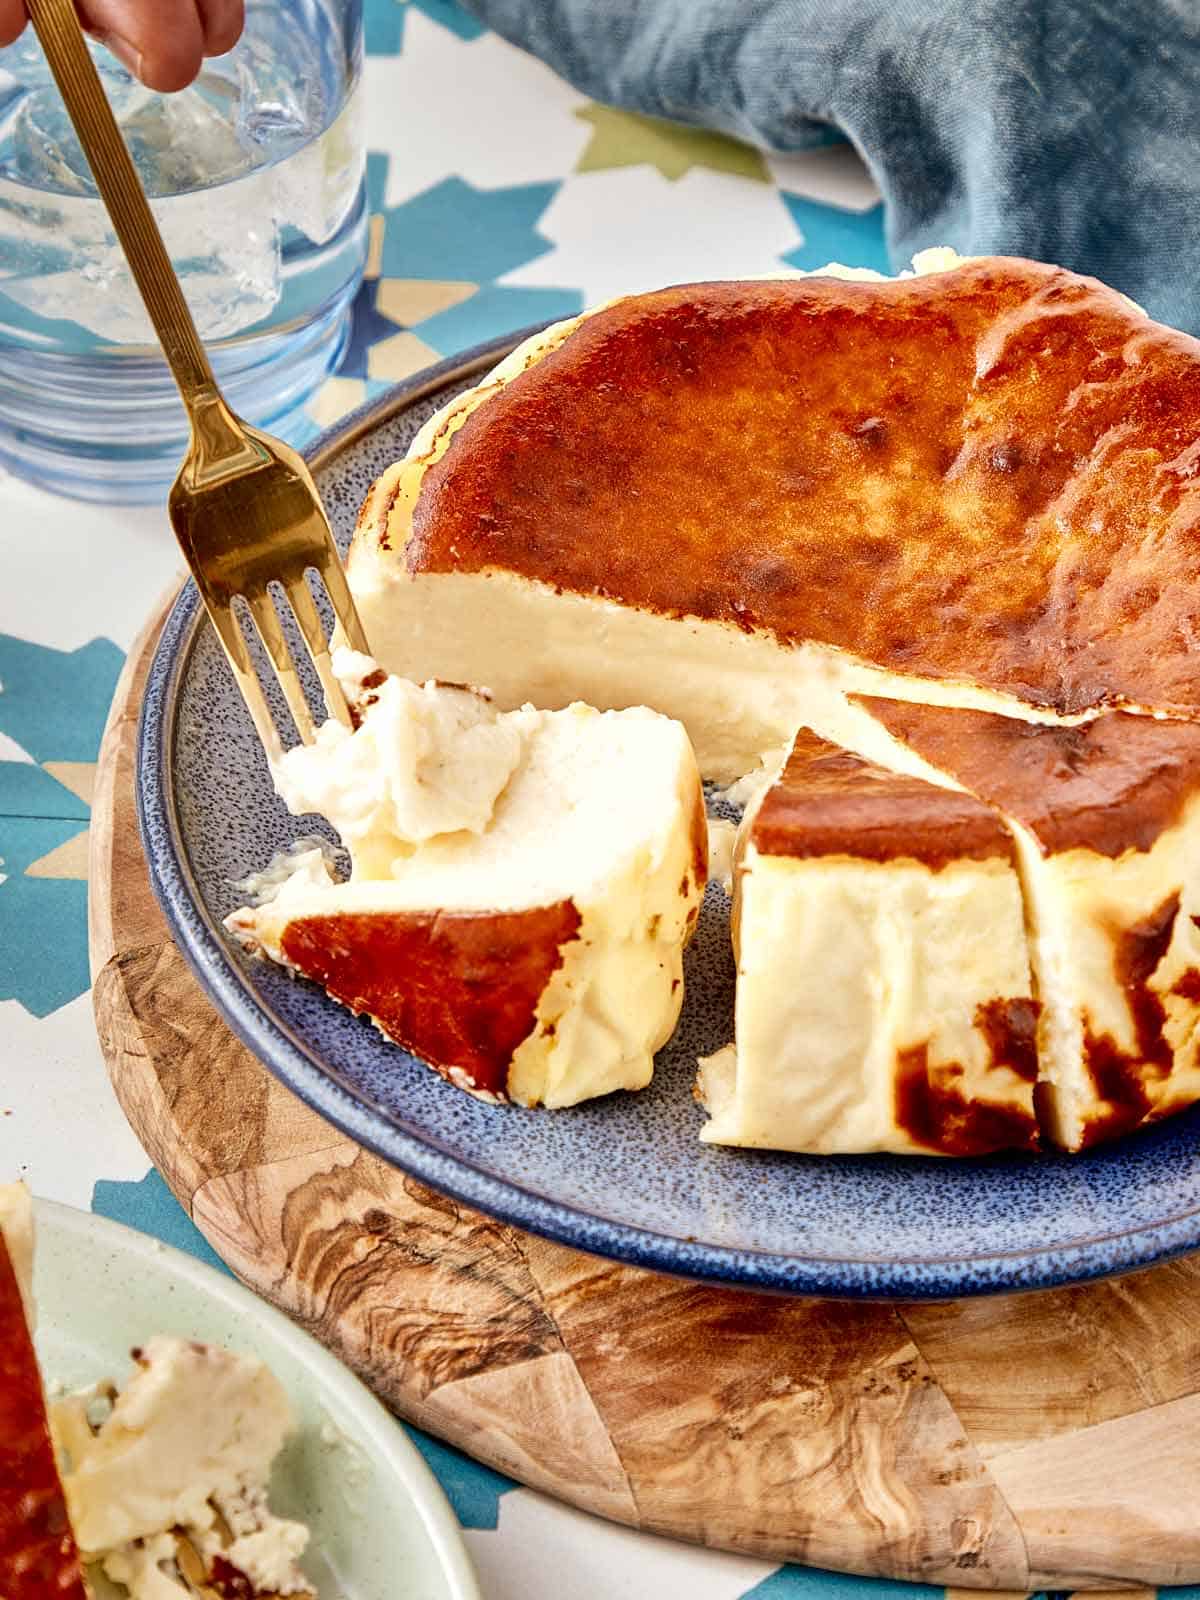
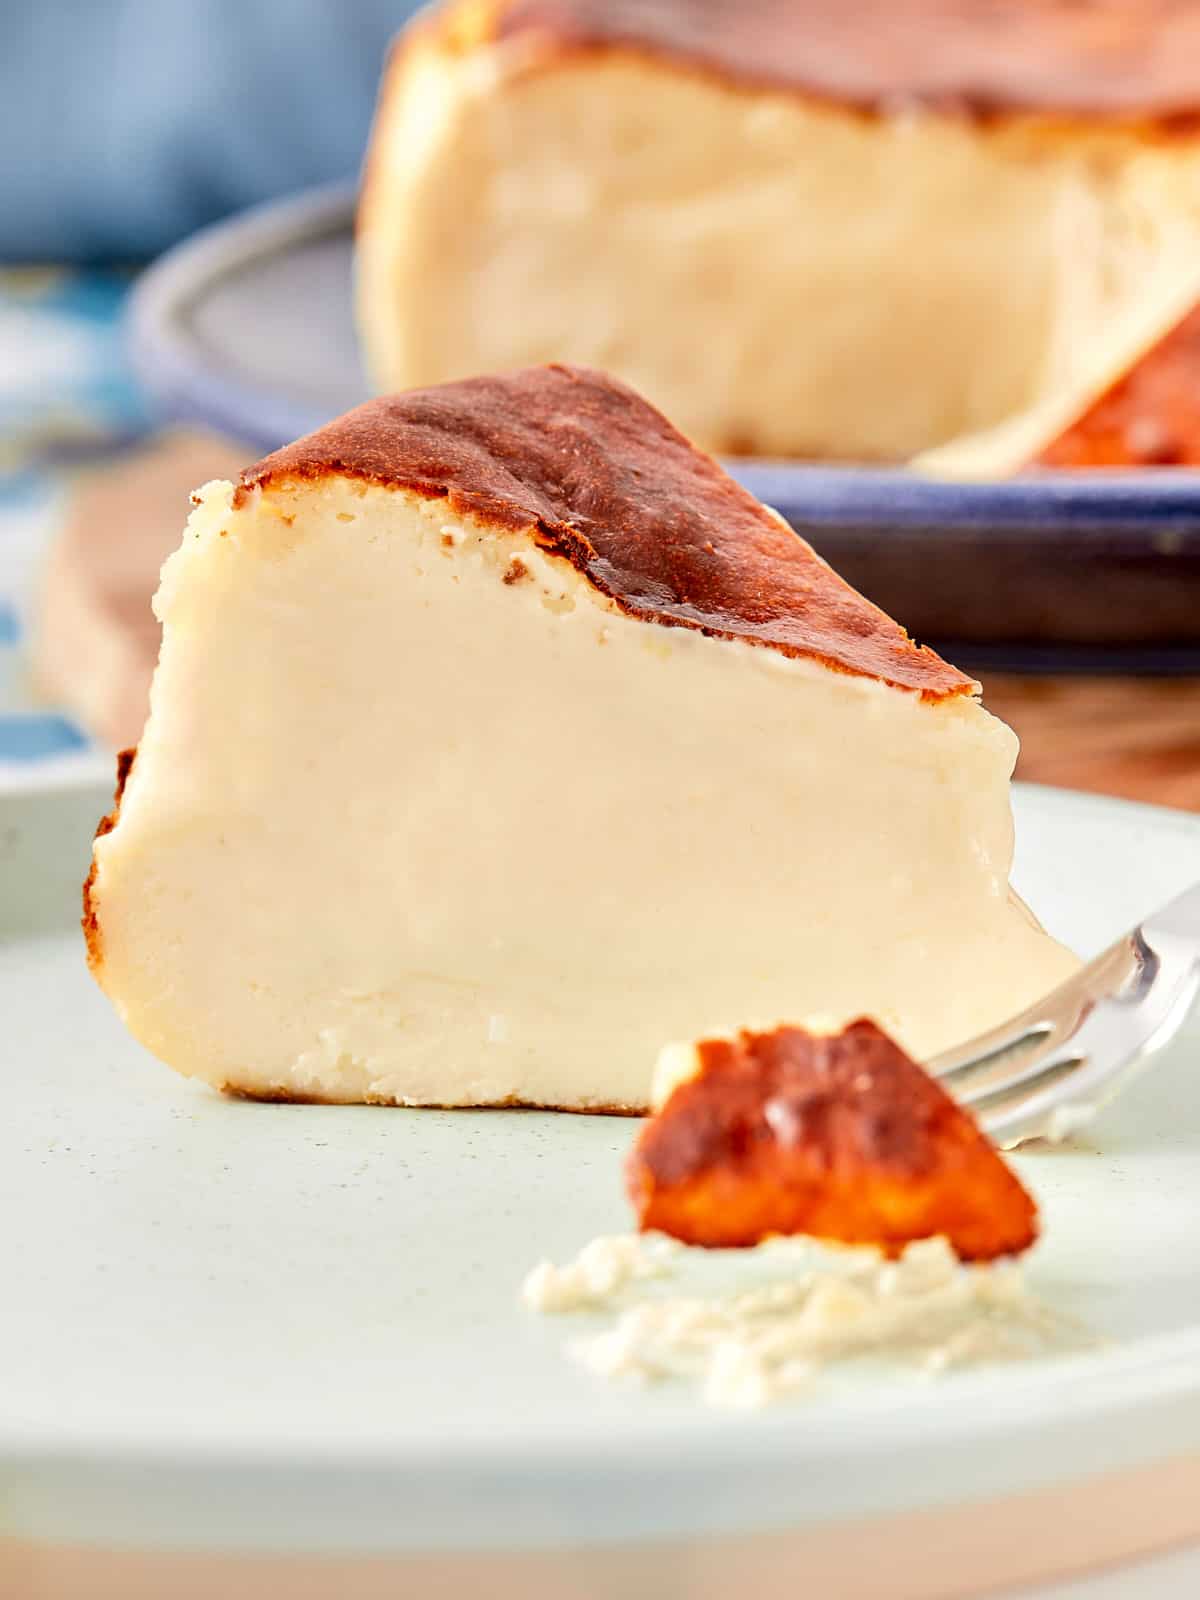
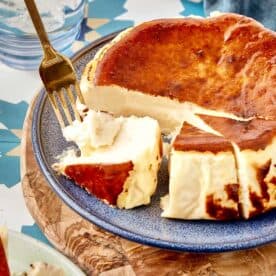
Meet the cheesecake that broke the internet. The Low-Fat Basque Cheesecake is everything your dessert dreams are made of, burnt and caramelized on the outside, irresistibly creamy (almost gooey!) in the center.
No crust, no fuss, just pure decadence baked at high heat until it’s beautifully rustic and golden. A little messy, a little dramatic… and absolutely unforgettable .
- What You’ll Need (and Why You’ll Love It)
- The Heart of This Cheesecake
- How To Lower The Calories
- Bake It ‘Til Golden
- FAQs
- See It In Action: Step-By-Step
- Basque Cheesecake Recipe
What You’ll Need (and Why You’ll Love It)
What makes this Basque Cheesecake so irresistible? First, that dramatic golden top—deeply caramelized, rustic, and full of flavor—turns what looks like a baking “mistake” into pure magic. Then there’s the dreamy center: custardy, creamy, and melt-in-your-mouth smooth. Chill it for a firmer slice or let it sit at room temp for that gooey, lava-like middle.
With no crust to fuss over, it’s just you, simple ingredients, and the oven working together to create something unforgettable. A little vanilla and lemon zest lift all that richness, giving every bite the perfect balance of bright and indulgent.
The Heart of This Cheesecake
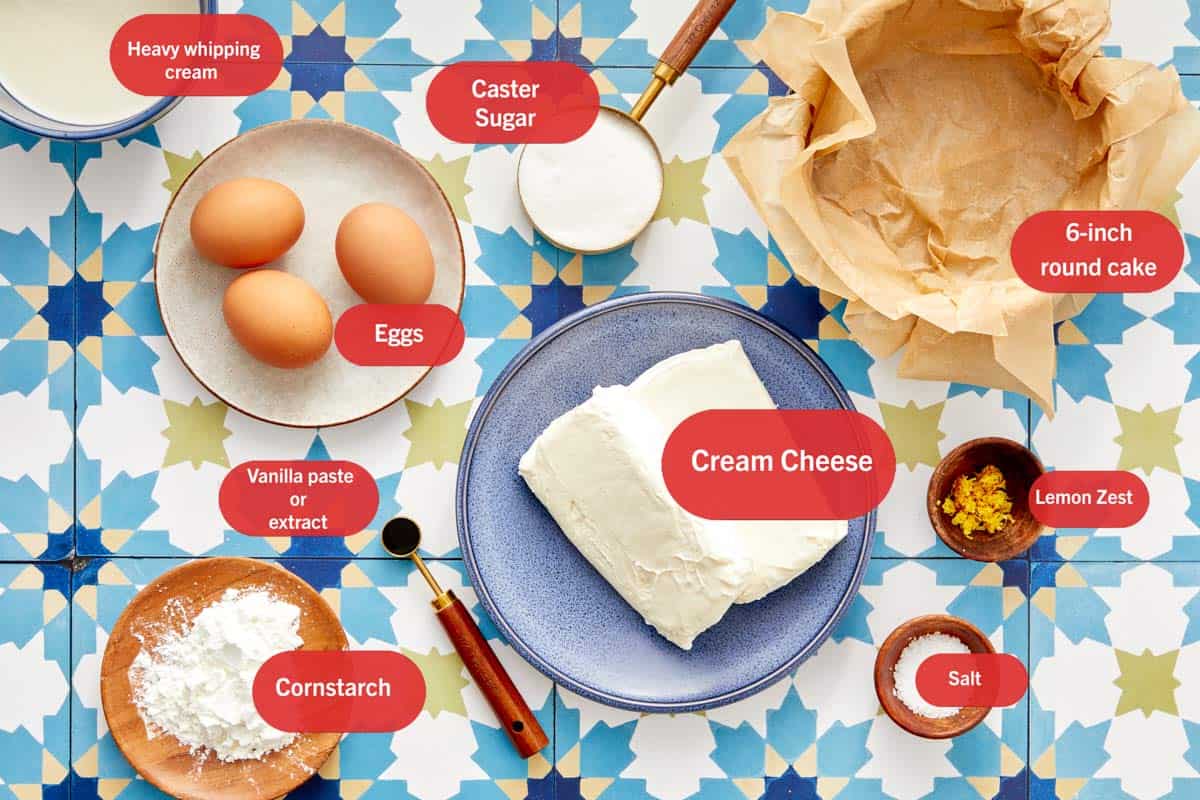
Every great cheesecake starts with just a few simple heroes. Here’s what makes this Basque beauty so unforgettable:
- Low-Fat Cream cheese – the heart of the cheesecake, giving it that smooth, tangy richness.
- Eggs – they hold everything together while keeping the center custardy and luscious.
- Heavy cream – adds silkiness and that dreamy melt-in-your-mouth texture.
- Caster Sugar – just the right touch of sweetness to balance the caramelized top.
Note : Find the full list of ingredients and measurements in the Recipe Card .
How To Lower The Calories
Cheesecake will always be a little bit of an indulgence, but that doesn’t mean it has to feel heavy. One of the easiest tweaks I make when baking Basque Cheesecake is to use low-fat cream cheese instead of the regular kind. It gives you the same creamy, tangy base, but with a lighter touch that doesn’t weigh you down after a slice (or two).
Another swap I love is using a sugar-free sweetener like Natvia in place of regular sugar. It still gives you that perfect balance of sweetness against the caramelized top, but without quite as many calories. The best part? No one ever notices the difference—family and friends always go back for seconds, and it tastes just as rich and decadent as the classic version.
Bake It ‘Til Golden
From mixing bowl to that dramatic caramelized crown in just six simple steps.

- Creamy base. Start by beating the softened cream cheese until it’s completely smooth and dreamy, with no lumps hiding in the mix.
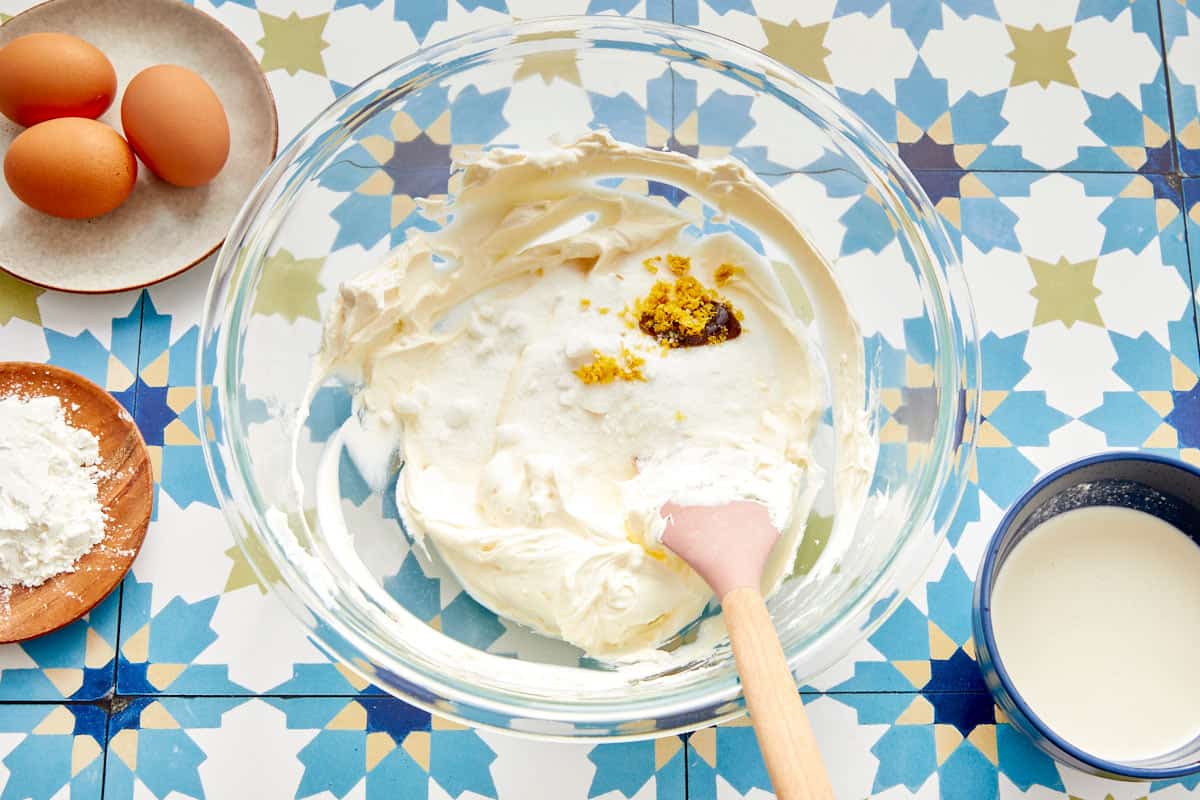
- Sweeten & flavor. Whisk in the sugar, a tiny pinch of salt, vanilla, and lemon zest. This is where the magic starts.
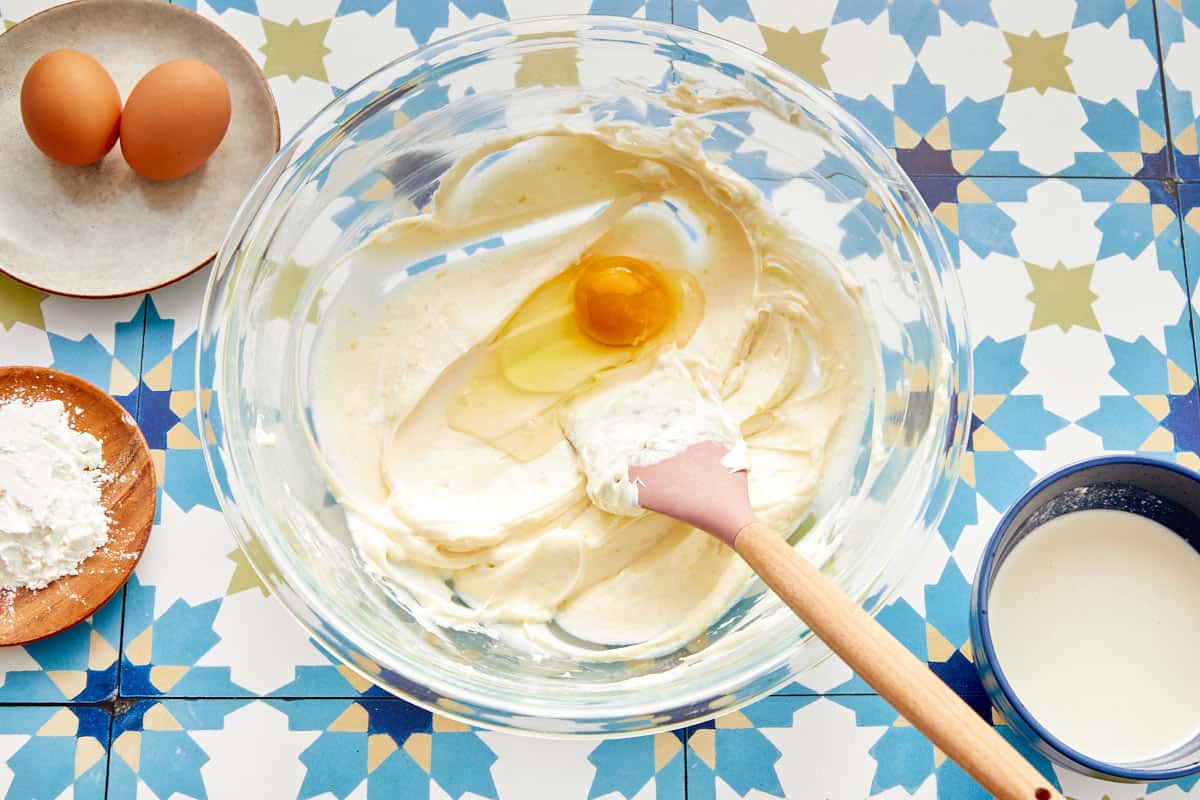
- Eggs in. Add the eggs one at a time, whisking gently after each so the batter stays silky and light. No rushing here—patience gives you that perfect custardy center.
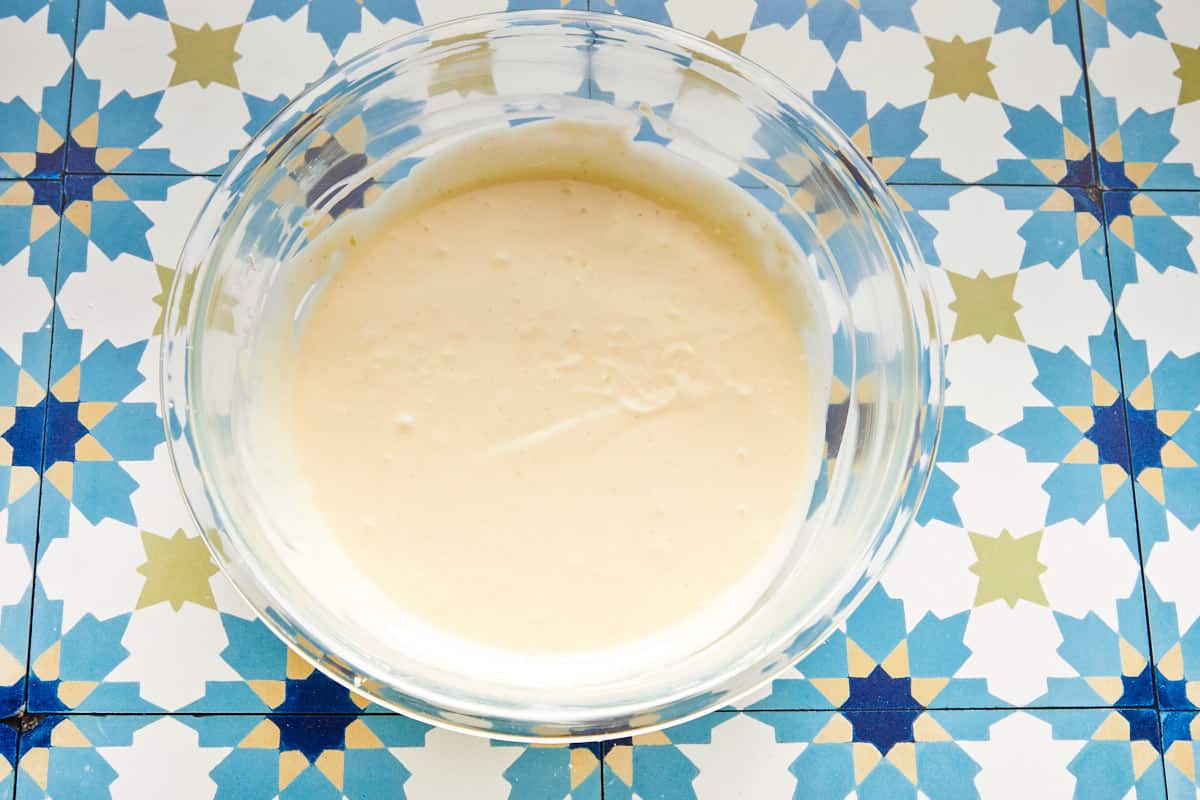
- Finish the batter. Sift in the cornstarch, then pour in the cream and whisk just until velvety. You don’t want to overmix. Think smooth, not bubbly.
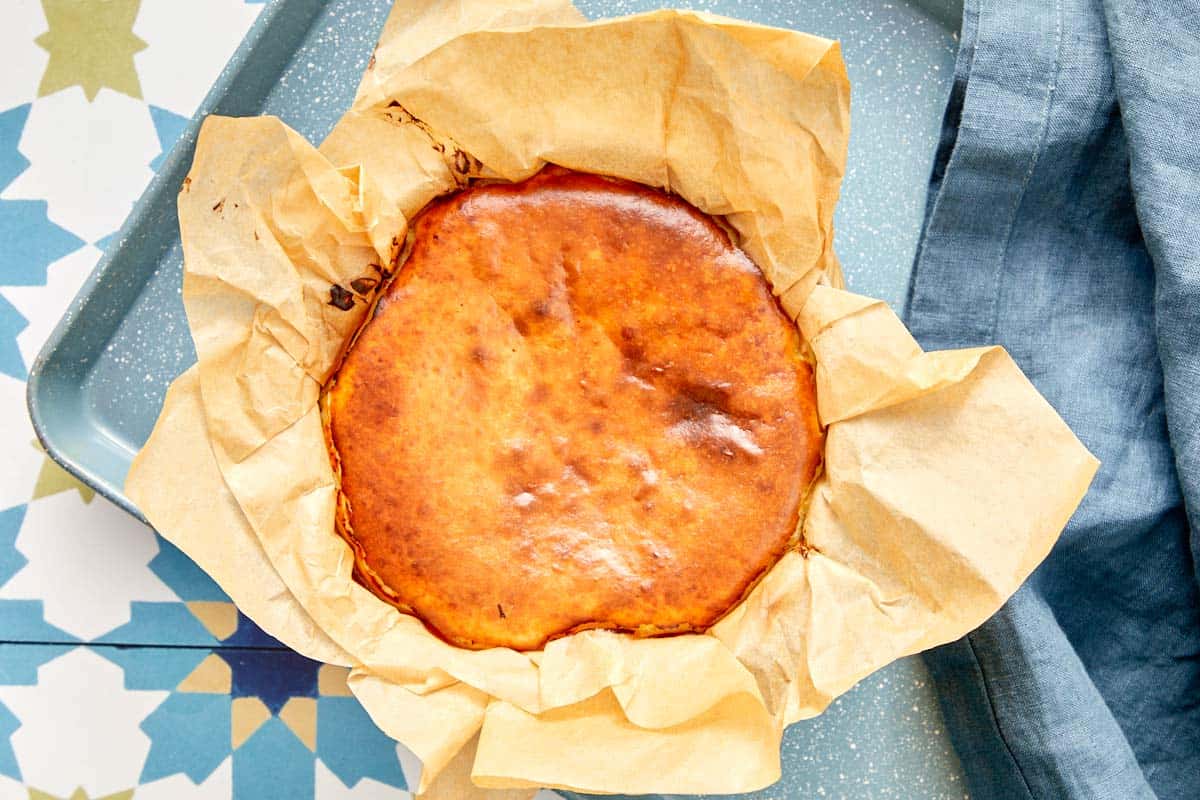
- Bake. Pour the batter into your pan, tap it once or twice to release air bubbles, and bake at 430°F (220°C) for about 25 minutes. You’re looking for a golden top with the center still giving a little jiggle.
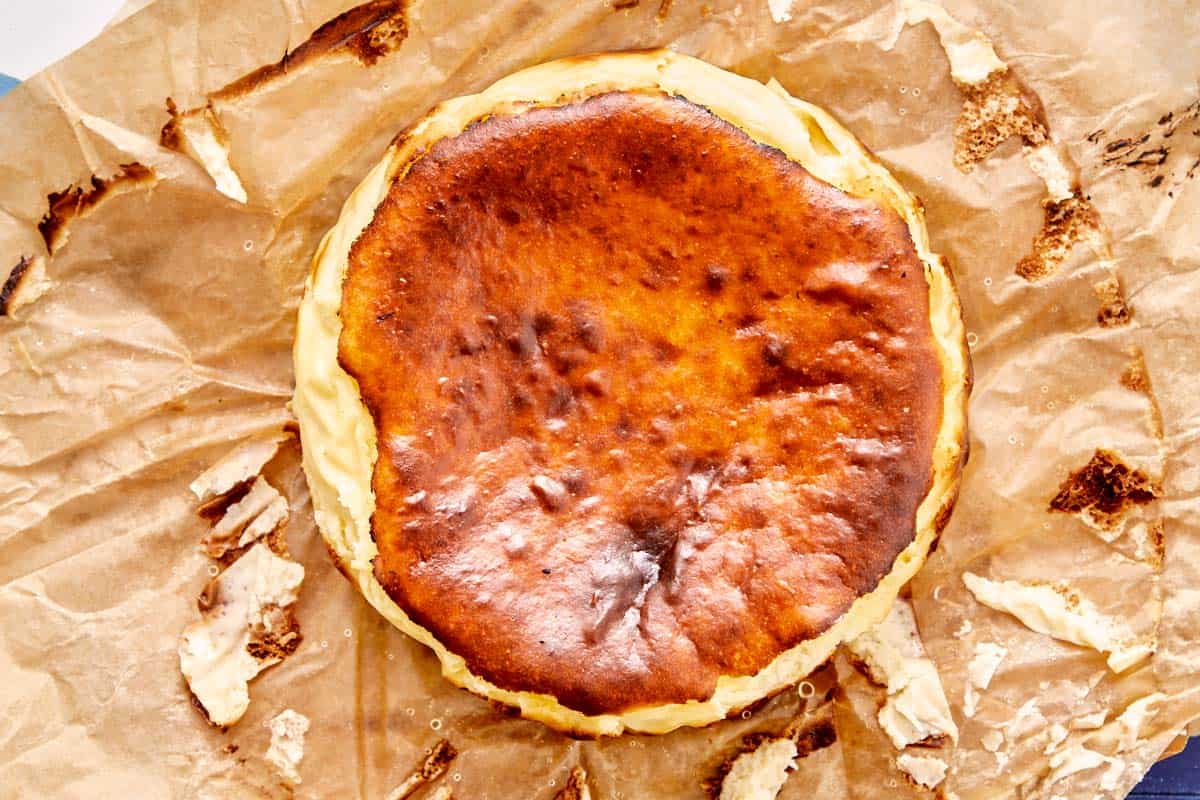
- Cool & chill. Let the cheesecake cool in the pan, then chill uncovered for at least 4 hours. Rest 30 minutes before serving for a gooey middle—or longer if you like it firmer. Slice with a hot knife for perfect cuts.
If this Basque Cheesecake stole your heart, here are a few more of my all-time favorites to keep the sweetness going. The Coffee Toffee Tiramisu is pure indulgence with creamy mascarpone and a hidden layer of coffee toffee magic. The Pistachio Skillet Cookie comes out golden with crisp edges and the most irresistible gooey, nutty center.
For something fun and nostalgic, Churros are fried to perfection—crispy, sugar-dusted, and made for dipping. The Chocolate Pecan Pie is my idea of comfort: molten chocolate, toasted pecans, and a whisper of bourbon for extra warmth. And when you’ve got bananas waiting on the counter, the Double Chocolate Banana Bread is rich, fudgy, and just the right kind of indulgent.
The top should be deeply golden and caramelized while the center still has a slight jiggle. That’s the sweet spot for a creamy, custardy texture.
Absolutely. Wrap it well in plastic wrap and foil, then freeze for up to 1 month. Thaw in the fridge overnight before serving.
Use a hot knife—dip it in hot water, wipe clean between slices, and you’ll get those picture-perfect cuts every time.
See It In Action: Step-By-Step
Get afreeeBook!
IngredientsUSMetric1x2x3x
- ▢ 13.5 oz cream cheese softened
- ▢ ½ cup caster sugar
- ▢ ⅛ tsp salt
- ▢ ½ tsp vanilla paste or extract
- ▢ 3 large eggs
- ▢ 2 tbsp cornstarch
- ▢ 6.8 fl oz heavy/whipping cream
- ▢ 1 tbsp lemon zest ≈ zest of 1 small lemon
Instructions
- Preheat oven to 445°F (230°C). Line a 6-inch round springform cake pan with baking paper, ensuring it rises at least 2 inches (5cm) above the rim.
- In a large mixing bowl, add softened cream cheese. Use a spatula to mix until smooth and lump-free.
- Add sugar, salt, vanilla, and lemon zest. Whisk until fully combined and smooth.
- Add the eggs one at a time, whisking until each is fully incorporated before adding the next.
- Sift in the cornstarch and whisk just until combined.
- Pour in the heavy cream and whisk until smooth.
- Place the cheesecake in the oven and immediately reduce heat to 430°F (220°C). Bake for about 25 minutes, or until the top is golden brown but the center still jiggles slightly.
- Let cheesecake cool in the pan on a wire rack until it reaches room temperature. Refrigerate uncovered for at least 4 hours to set.
- Gently remove the cheesecake from the pan and peel back the baking paper
Notes
- Lower the calories: A great tip I do all the time when making this is to use low fat cream cheese and a sugar-free alternative (to sugar) like natvia. It keeps its same great taste while making it just a bit more of a feel-good treat
- Texture preference: For a gooey center, let the cheesecake sit at room temperature for 30 minutes before serving. If you prefer a firmer texture, chill it longer in the fridge.
- Cutting tip: Use a hot knife (dip in hot water and wipe clean between slices) to avoid the creamy center sticking to the blade and ruining the shape.
- Pan size: Recipe fits a 6-inch (15cm) round pan. For larger pans, reduce baking time slightly.
- Baking paper: Line with parchment that rises at least 2 inches (5cm) above the rim, as the cheesecake puffs up.
- Browning: The dark, caramelized top is intentional and adds flavor—don’t worry if it looks burnt.
- Flavor twist: Try a splash of liqueur (Amaretto, Grand Marnier, Rum) or a pinch of cinnamon.
- Serving ideas: Pair with berries, honey, or whipped cream.
- Storage: Refrigerate up to 3 days. Let slices rest at room temp before serving for the best texture.
- Freezing: Wrap well and freeze up to 1 month. Thaw in the fridge overnight.
Nutrition
Nutrition information is automatically calculated, so should only be used as an approximation.
Basque Cheesecake Recipe
Ingredients
- 13.5 oz cream cheese softened
- ½ cup caster sugar
- ⅛ tsp salt
- ½ tsp vanilla paste or extract
- 3 large eggs
- 2 tbsp cornstarch
- 6.8 fl oz heavy/whipping cream
- 1 tbsp lemon zest ≈ zest of 1 small lemon
Instructions
- Preheat oven to 445°F (230°C). Line a 6-inch round springform cake pan with baking paper, ensuring it rises at least 2 inches (5cm) above the rim.
- In a large mixing bowl, add softened cream cheese. Use a spatula to mix until smooth and lump-free.
- Add sugar, salt, vanilla, and lemon zest. Whisk until fully combined and smooth.
- Add the eggs one at a time, whisking until each is fully incorporated before adding the next.
- Sift in the cornstarch and whisk just until combined.
- Pour in the heavy cream and whisk until smooth.
- Place the cheesecake in the oven and immediately reduce heat to 430°F (220°C). Bake for about 25 minutes, or until the top is golden brown but the center still jiggles slightly.
- Let cheesecake cool in the pan on a wire rack until it reaches room temperature. Refrigerate uncovered for at least 4 hours to set.
- Gently remove the cheesecake from the pan and peel back the baking paper
Notes
- Lower the calories: A great tip I do all the time when making this is to use low fat cream cheese and a sugar-free alternative (to sugar) like natvia. It keeps its same great taste while making it just a bit more of a feel-good treat
- Texture preference: For a gooey center, let the cheesecake sit at room temperature for 30 minutes before serving. If you prefer a firmer texture, chill it longer in the fridge.
- Cutting tip: Use a hot knife (dip in hot water and wipe clean between slices) to avoid the creamy center sticking to the blade and ruining the shape.
- Pan size: Recipe fits a 6-inch (15cm) round pan. For larger pans, reduce baking time slightly.
- Baking paper: Line with parchment that rises at least 2 inches (5cm) above the rim, as the cheesecake puffs up.
- Browning: The dark, caramelized top is intentional and adds flavor—don’t worry if it looks burnt.
- Flavor twist: Try a splash of liqueur (Amaretto, Grand Marnier, Rum) or a pinch of cinnamon.
- Serving ideas: Pair with berries, honey, or whipped cream.
- Storage: Refrigerate up to 3 days. Let slices rest at room temp before serving for the best texture.
- Freezing: Wrap well and freeze up to 1 month. Thaw in the fridge overnight.
Nutrition
Thank You! https://cafedelites.com/basque-cheesecake/
Okay, can we all agree that Taco Tuesday is literally the best night of the week?! It’s my go-to for a fun, easy dinner that I know everyone will love. And since this year’s National Taco Day is happening on a Tuesday (Oct 7th!), we are going ALL out!
I’ve gathered my absolute best, most-loved Taco Tuesday ideas to make your next taco night a total knockout. We are not the only ones crazy about Taco Tuesday Old El Paso is declaring October 7 “ National Taco Day-Off ” and giving you a chance to win a trip to a Cowboy Ranch.
How to Make The Quickest Tacos
I know weeknights are crazy! You want an amazing Taco Tuesday, but you need it FAST. These are my secret weapons for getting delicious tacos on the table in under 30 minutes.
- Prep Ahead: Chop your lettuce, tomatoes, and onions in the morning or the night before. Store them in airtight containers in the fridge. When it’s time to eat, you just have to set them out!
- Use Smart Shortcuts: Don’t be afraid to use pre-shredded cheese, a bag of slaw mix, or a good quality store-bought pico de gallo or guacamole to save time. You can find pico de gallo in the refrigerated section, I love the one from Trader Joe’s . It’s known for being consistently fresh, chunky, and having a great flavor. My biggest tip for any store-bought pico is to drain off any extra liquid at the bottom of the container and give it a stir. If you want to make it taste homemade, add a quick squeeze of fresh lime juice and a little chopped cilantro. It makes all the difference!
- Cook The Meat in Batches: I love to cook a double batch of taco meat on Sunday. I use half for dinner that night and save the other half for Tuesday. It reheats in minutes and its good to store in an airtight container in the fridge for 3 to 4 days.
What to stuff in a Perfect Taco?
Building the perfect taco is an art, and it’s all about the layers! Here’s my guide to the essential components.
- The Tortilla: Choose your base! Flour tortillas are soft and pliable, great for over-stuffed tacos these are my personal favourite, I use the Tortilla Land uncooked flour tortillas. You find them in the refrigerated section and cook them in a hot pan for about 30 seconds per side. They puff up and taste incredible. Corn tortillas offer an authentic, slightly sweet flavor and are amazing when quickly charred on a gas stove or in a hot pan. Hard Shells give you that classic, satisfying crunch.
- The Protein: While the recipes below give you tons of options, don’t be afraid to mix it up! Pick from seasoned ground beef, shredded chicken, spicy chorizo, or black beans for a great veggie option.
- The Toppings (The Best Part!): Get creative with a taco bar! Set out bowls of lettuce, tomatoes, onions, cilantro, jalapeños, cheese, sour cream, salsa, and guacamole!
Our 10 Must-Make Taco Recipes
Now that you’re armed with all the pro tips, let’s get to the recipes!
Planning a bigger fiesta? Check out my Best New Year’s Eve Appetizers for more crowd pleasing bites that pair perfectly with tacos! Or downsize for a couples romantic date night menu ideas here.

Crispy Fish Tacos

Beef Mince Tacos (Better Than Takeout)

Viral Smash Burger Tacos

Easy Birria Tacos

Oven-Baked Barbecue Chicken ‘Pizza’ Tacos

Korean Bulgogi BBQ Beef Tacos
Slow Cooker Barbacoa Short Rib Tacos

Easy Taco Salad
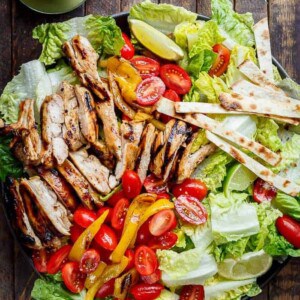
Grilled Tequila Lime Chicken Taco Salad
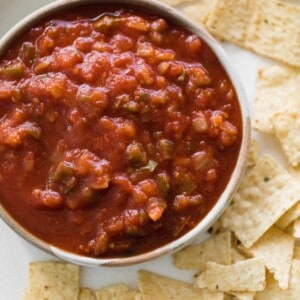
The Only Salsa Recipe You’ll Ever Need

Pico De Gallo